Associated with: WITS Points (that support the Override feature and have it enabled).
Security permission required to access this pick action: Override/Release.
You use the Override action to temporarily override a point's measured value with a new value.
You can apply an override to a point in both ClearSCADA and/or the Field Device. A ClearSCADA override does not affect the value of the point in the Field Device. An override in the Field Device is called an 'Outstation Override' in ClearSCADA.
To return to using the measured point value, you use the Release Override action.
You might use the Override action:
- If a known fault is causing the Field Device to report an incorrect value for the point
- If you want to perform a test by using a specific value rather than a measured value.
Using the Override action can help to prevent ClearSCADA or the Field Device from raising alarms unnecessarily, and can help to ensure that accumulators remain accurate.
NOTE: The device profile indicates the types of point (if any) you can override in the Field Device. You can override all types of point in ClearSCADA (see Display a WITS Device Profile).
To enable the override feature, you use the fields within the Point Form's <Point Type> tab (see Define whether an Analog Point can be Overridden in the ClearSCADA Guide to Core Point Configuration and see Define whether a Digital Point can be Overridden in the ClearSCADA Guide to Core Point Configuration and see Define Whether a Counter Type Point can be Overridden in the ClearSCADA Guide to Core Point Configuration).
To apply an override to a point's value, follow this procedure:
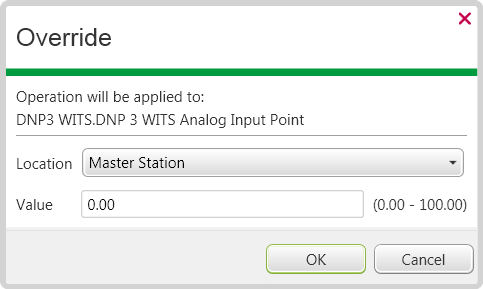
- Select the Override action to display the Override window.

- In the Location field, use the combo box to specify the override location. You can override the point in ClearSCADA (the Master Station) or in the Field Device (the Outstation).
NOTE: A derived point in the Field Device will also use any override applied to its parent point in the Field Device.
- For analog points and counter points: In the Value field, specify the override value. Enter a value within the range specified by the user when enabling the override feature for the point. ClearSCADA displays a message if you enter a value outside this range.
For digital points: Use the combo box to specify the state to which you want to override the point.
- Select the OK button to apply the override. Depending on the system configuration, ClearSCADA may prompt you to confirm your override request.
NOTE: When you remove an override from an analog input point in the Field Device, the Field Device applies any configured hysteresis or persistence to the point if the point may subsequently move from one state to another (including the normal state). Similarly, when you remove an override from a binary input point in the Field Device, the Field Device applies any configured persistence.
Whenever ClearSCADA overrides a point's value:
- ClearSCADA logs an entry in the Event Journal
- The point's Override status attribute indicates that an override is in force (see DNP3 Driver Specific <Update Type> Status Values in the ClearSCADA Guide to the DNP3 Driver).
- The point's color on displays such as Queries Lists indicates whether the override is:
A Field Device may allow you to apply and release overrides locally (in addition to applying them from ClearSCADA). The Field Device sets the DNP3 object status flag 'local forced' while the point is overridden. ClearSCADA shows this status in the relevant displays.
A configuration upload includes any overrides a user has applied or released locally at the Field Device ((see Upload Configuration (WITS Outstation))).
Further Information
Actions that are Common to Many Drivers in the ClearSCADA Guide to Drivers.