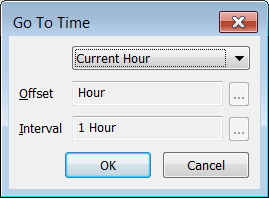
You can use the Go To Time option to force the X-Y Plot display to show a specific interval. By using the Go To Time option, you change the amount of time that is shown on the Time Interval.
To move to a specific time on an X-Y Plot:
- Display an X-Y Plot in Run Mode.
NOTE: The Go To Time option is also available when you are configuring the X-Y Plot in Design mode.
- Right-click on the Time Line.
A context-sensitive menu is displayed. - Select the Go To Time option.
The Go To Time window is displayed.
- Use the combo box at the top of the Go To Time window to select one of the following options:
- Current Minute—Sets the Time Line to represent 1 minute starting from the beginning of the current minute.
- Previous Minute—Sets the Time Line to represent 1 minute starting from the beginning of the previous minute.
- Current Hour—Sets the Time Line to represent 1 hour starting from the beginning of the current hour.
- Previous Hour—Sets the Time Line to represent 1 hour starting from the beginning of the previous hour.
- Today—Sets the Time Line to represent 24 hours starting from the beginning of the current day.
- Yesterday—Sets the Time Line to represent 24 hours starting from the beginning of the previous day.
- This Week—Sets the Time Line to represent 7 days starting from the beginning of the current week.
- Last Week—Sets the Time Line to represent 7 days starting from the beginning of the previous week.
- This Month—Sets the Time Line to represent the current month starting from the beginning of the first day in the month.
- Last Month—Sets the Time Line to represent the previous month starting from the beginning of the first day in the month.
- This Year—Sets the Time Line to represent the current year starting from the beginning of the first day in the year.
- Last Year—Sets the Time Line to represent the previous year starting from the beginning of the first day in the year.
- Relative Time—Allows you to specify a time that is relative to the current time. When you select this option, you need to enter an Offset and Interval (see step 5).
- Specific Time—Allows you to specify an exact date and time. When you select this option, you need to enter a Time and Interval (see step 6).
If you have selected a predefined amount of time, the other fields in the Go To window are grayed out. Proceed to step 7.
If you have selected the Relative Time option, proceed to step 5.
If you have selected the Specific Time option, proceed to step 6.
- Define the Offset and Interval for the Relative Time:
- Use the Offset field to define the start time for the interval. Enter the required offset in the OPC Relative Time Format. You can enter the value directly in the field, or use the Offset window (accessed via the field's browse button) to specify the required value.
- Use the Interval field to define the total amount of time to be shown on the Time Line. Enter the required interval in the OPC Time Format. You can enter the value directly in the field, or use the Interval window (accessed via the field's browse button) to specify the required value.
NOTE: You can only specify an interval that begins after the offset start time.
- Proceed to step 7.
- Define the Time and Interval for the Specific Time:
- Use the Time combo-box to select a specific time and date. For information on specifying a different date or time to that shown, see Specifying the Required Entry in a Date and Time Field in the ClearSCADA Guide to Core Configuration.
- Use the Interval field to define the total amount of time to be shown on the Time Line. Enter the required interval in the OPC Time Format. You can enter the value directly in the field, or use the Interval window (accessed via the field's browse button) to specify the required value.
NOTE: You can only specify an interval that begins after the start time.
- Select the OK button on the Go To Time window to confirm your selections.
The Go To Time window is closed. The X-Y Plot displays the data for the selected time automatically.
By using the Go To Time window to navigate to a specific time on the X-Y Plot, you set the X-Y Plot to override its default settings (the settings that are configured for the X-Y Plot). You can reinstate the default settings at any time by using the Revert to Defaults option (see Reinstate the Default Settings for an X-Y Plot).